If you’ve been considering how to stain your cabinets, you’re in the right place! Staining your cabinets is an affordable way to give your kitchen or bathroom a fresh look without the hassle of a complete remodel.
If you’re wondering how to tackle this cabinet painting project on your own, we’ve got you covered. In this guide, we’ll walk you through everything you need to know about how to stain your cabinets, from preparation to finishing touches, with tips from our expert cabinet painters in Orlando, FL.
Let’s learn how to get your cabinets looking brand new with just a little effort and the right supplies.
Key Takeaways:
- Staining cabinets is a cost-effective upgrade. Transform your space without full cabinet replacement.
- Prep is key. Proper cleaning, sanding, and conditioning make all the difference.
- Use quality stains and finishes. A good stain enhances the wood’s natural beauty and durability.
- Consider professional help. Experienced cabinet painters ensure a smooth, lasting finish.

How to Stain Your Cabinets?
Before diving into the steps of how to stain your cabinets, there are a few key things you should know. Staining your cabinets is an effective way to enhance their appearance without the need for a full replacement. It’s an affordable and straightforward process that can bring out the natural beauty of the wood.
In Orlando, FL, homeowners are increasingly choosing cabinet staining as a way to update their kitchens and bathrooms without the hassle of a major renovation. Here’s what you need to know before you get started!
What You’ll Need to Get Started
Before you get to work on how to stain your cabinets, it’s important to gather all the necessary materials. This will make your project run smoothly and ensure you get the best results. Here’s a simple list to get you started:
- Sanding block or electric sander: To smooth out any old finish and rough up the wood so the stain can adhere better.
- TSP (Trisodium Phosphate) or degreaser: To clean your cabinets and remove any dirt, grease, or grime.
- Wood conditioner: A necessary step to ensure an even finish and prevent blotchiness in the stain.
- Stain: Your choice of wood stain—this is the fun part! Choose a color that complements the rest of your home, whether you’re going for rich browns, cool grays, or a lighter natural wood finish.
- Brush or rag: To apply your stain. Depending on your preference, you may use a brush or cloth.
- Polyurethane (optional): To seal your cabinets after staining for added protection.
- Plastic sheeting or drop cloths: Protect the area around your cabinets to avoid unwanted splatters.
Step 1: Prepare Your Cabinets for Staining
The first step when learning how to stain your cabinets is all about preparation. This is crucial for achieving a smooth and long-lasting finish. Here’s how you can set up your cabinets:
- Remove cabinet doors and hardware. Start by unscrewing the cabinet doors and removing any knobs, handles, and hinges. Keep everything in separate bags and label them to make reassembly easy later on.
- Clean your cabinets. If your cabinets are already painted or stained, you need to clean them thoroughly to remove grease, dust, and dirt. You can use TSP or a mild degreaser to scrub down the surfaces. If the cabinets are already stained, skip the deep cleaning, but be sure to remove any dust.
- Sand the surface. Sanding is essential, even if you’re just restaining your cabinets. It helps the stain adhere better and creates a smooth surface. Use a sanding block or electric sander with medium grit sandpaper. Be sure to remove all the old finish if you’re changing the color drastically. For a smoother look, finish with fine grit paper.
Step 2: Apply a Wood Conditioner
Before you begin staining, it’s essential to apply a wood conditioner. This will help the stain apply evenly and prevent blotchiness, which can happen if the wood absorbs the stain unevenly. Applying a wood conditioner is especially important for softwoods like pine, as they tend to absorb stain unevenly.
Simply apply the conditioner with a brush or rag, and allow it to dry according to the product instructions. Once it’s dry, you’ll be ready for staining.
Step 3: Time to Stain Your Cabinets
This is the part where you see your hard work start to pay off. When figuring out how to stain your cabinets, the application process is key. Here’s how to do it:
- Test the stain. Before going all-in, it’s wise to test the stain on an inconspicuous area of the cabinet. Let it dry completely to see how it looks before applying it to the entire cabinet.
- Apply the stain. Dip your brush or rag into the stain and apply it to the cabinets. Work in long, smooth strokes in the direction of the grain. If you’re using a brush, be sure to brush along the grain to avoid streaking.
- Wipe away excess. After applying the stain, use a clean cloth to wipe off any excess. The longer you leave the stain on, the darker the color will be. If you want a lighter finish, wipe it off sooner.
If you’re unsure about the amount of stain you should apply, spray paint vs brush paint cabinets can be another approach to consider. Sometimes, a sprayer can help create a more even, glossy finish.
Step 4: Apply a Second Coat (If Necessary)
Once the first coat of stain is dry (usually after a few hours), you may need to apply a second coat. This will deepen the color and ensure a more uniform look. Lightly sand the cabinets with fine-grit sandpaper before applying the second coat to remove any imperfections or dust. Always wipe away the dust with a tack cloth before applying the second coat.
Step 5: Seal the Cabinets
Once your cabinets have the perfect stain color, the final step is sealing them. Polyurethane is the most common option for sealing stained cabinets. It helps protect the wood from moisture, scuffs, and scratches, especially if your cabinets are in high-use areas like the kitchen.
Apply the polyurethane in thin, even coats, following the grain of the wood. After the first coat dries, lightly sand it with very fine sandpaper to remove any bubbles or imperfections before applying the second coat.
Step 6: Reassemble Your Cabinets
Now that your cabinets are stained and sealed, it’s time to put everything back together. Reattach the hardware, hinges, and cabinet doors. If you’re not happy with the hardware you initially had, now might be a great time to swap out your old knobs and pulls for something fresh that complements your newly stained cabinets.
Tips and Tricks for the Best Results
- Take your time. Rushing through the steps could lead to uneven finishes. Make sure each coat is dry before applying another.
- Avoid staining in direct sunlight. Staining your cabinets in direct sunlight can cause the stain to dry too quickly and leave streaks.
- Ventilate the area. Always work in a well-ventilated space to avoid inhaling fumes from the stain or polyurethane.
- Consider hiring cabinet painters. If you want the perfect finish and don’t want to deal with the work yourself, it might be worth considering professional help.
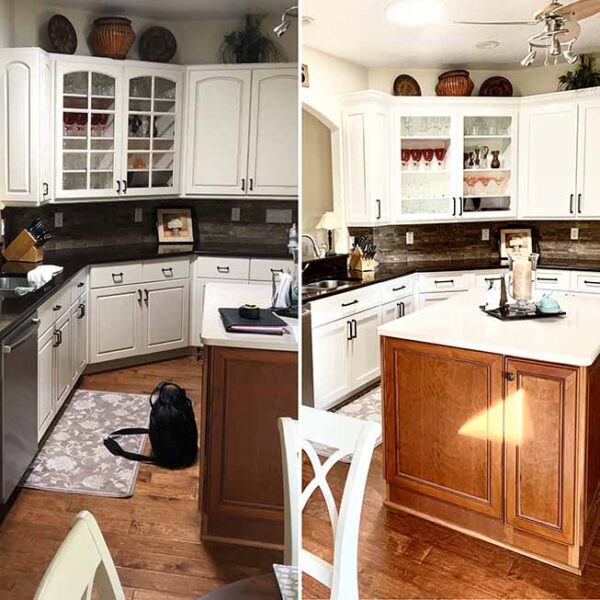
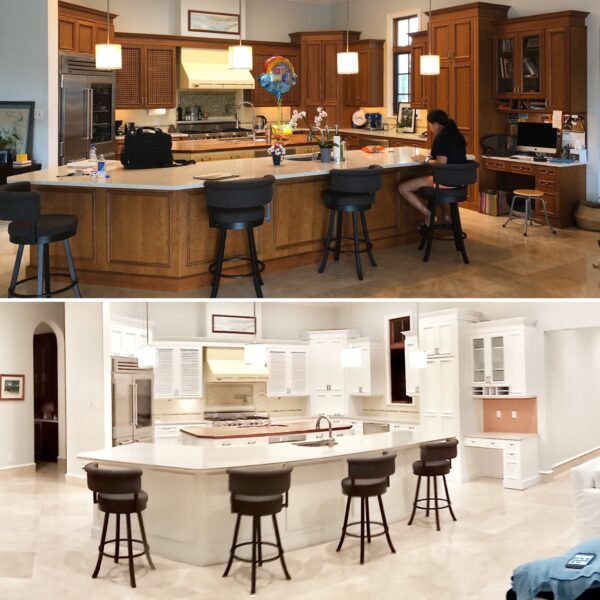
Before and After Cabinet Painting Projects
Conclusion: Enjoy Your Beautiful, Stained Cabinets
In conclusion, how to stain your cabinets is all about preparation, patience, and attention to detail. By following the steps above, you can achieve beautiful, refreshed cabinets that look brand new. Whether you’re updating your kitchen, bathroom, or any other space, staining your cabinets is an affordable and rewarding way to enhance your home.
If you’re looking to have your cabinets stained by professionals, Cabinet Coating Kings is here to help. Our team of experienced cabinet painters in Orlando, FL will guide you through the process and make sure the job is done right. From the initial preparation to the final sealing, we ensure a smooth, even finish.
Contact us today at 407-917-9535 for your FREE estimate, and let us transform your cabinets into a stunning centerpiece of your home!